
Share 8 ways to open the virtual keyboard on Windows 10
The Windows 10 virtual keyboard is a quite useful and necessary feature in some cases for Windows users. The On-Screen Keyboard (OSK) was first integrated on Windows XP, and has been maintained up to now. It proves to be extremely useful when your physical keyboard has a broken key, you suspect your computer is infected with a virus or keylogger...
This virtual keyboard is very intuitive, with all the standard keys, you can use a mouse or another pointing device to select the keys or use a physical key or group of keys to move through the keys on the screen.
8 ways to open the virtual On Screen Keyboard on Windows 10
1. Open the virtual keyboard with a shortcut
Press Win + Ctrl + O to turn the virtual keyboard on or off.
If your keyboard is broken, use the mouse to highlight "osk" and copy, then paste it into the Windows 10 search box.
2. Open the virtual keyboard from the Start Menu
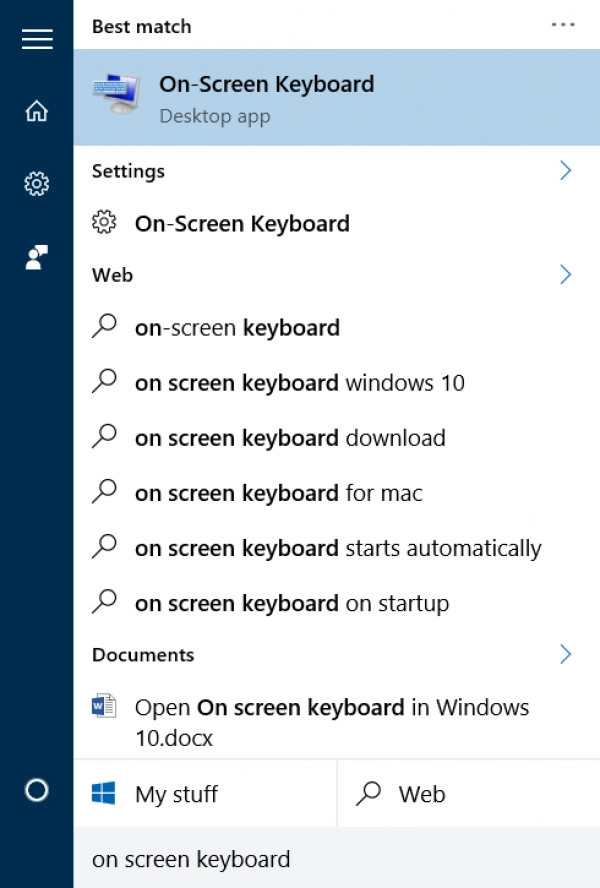
Enter the keyword On screen keyboard into the Search box on the Start Menu or on the Taskbar then press Enter to open the virtual On screen keyboard on Windows 10. If your keyboard is broken and you can't type, see method 5, or ask someone to send you the word "osk" via a messaging app, use the mouse to copy and paste into the search box.
3. Open the virtual keyboard from the Run command window
To open the virtual keyboard from the Run command window, follow the steps below:
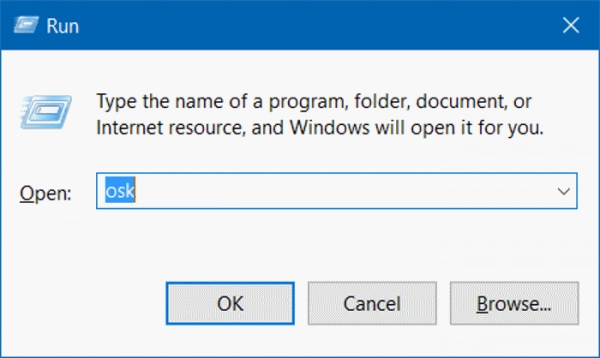
Step 1: Press the Windows + R keys to open the Run command window.
Step 2: In the Run command window, type "OSK" (no need for uppercase) then press Enter to open the virtual keyboard.
4. Open the virtual keyboard through Command Prompt or PowerShell
Follow the steps below to open the virtual keyboard through Command Prompt or PowerShell:
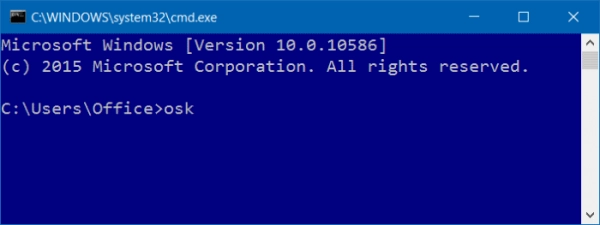
First open the Command Prompt or PowerShell window, then type "OSK" into it and press Enter.
5. Open the virtual keyboard in Ease of Access via the Start menu
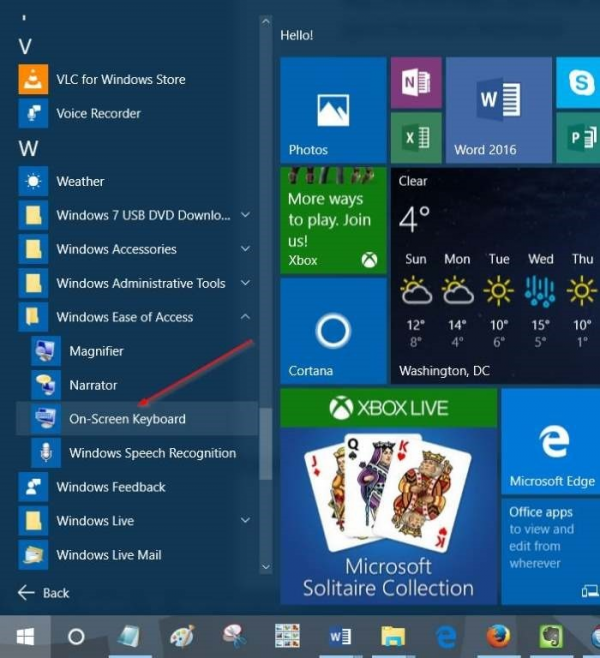
Open the Start Menu, then click select All apps then click select the Windows Ease of Access folder icon to expand the folder, then click select On Screen Keyboard to open the virtual On Screen Keyboard.
6. Use the Ease of Access Centre in PC Settings
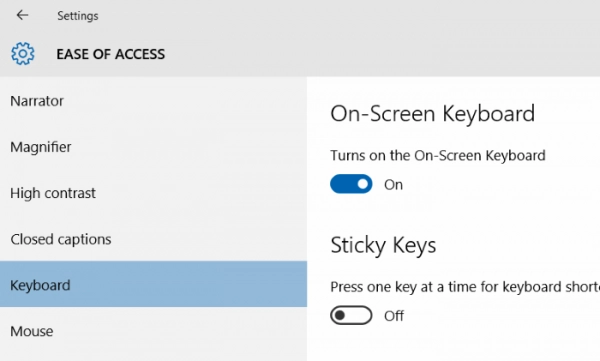
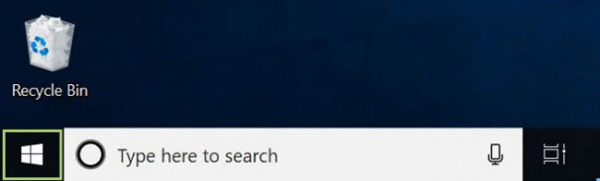
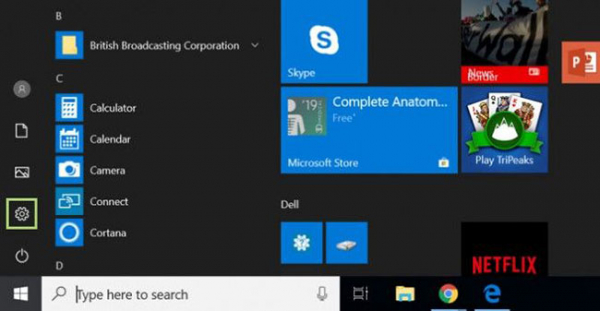
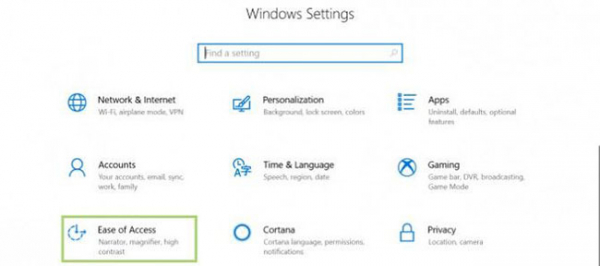
Step 1: Open the Settings app by clicking the Settings icon at the bottom left of the Start Menu.
Step 2: In the Settings window, find and click select Ease of Access.
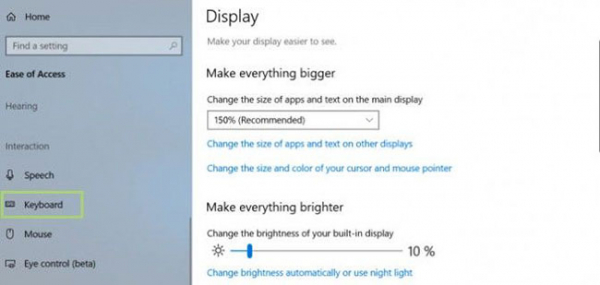
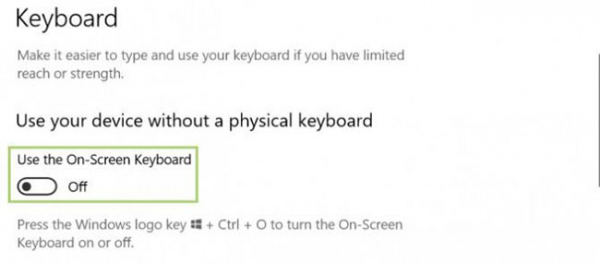
Step 3: Click select Keyboard, then in the Turns on the on-screen keyboard option switch the selection to ON.
7. Open the virtual keyboard through Control Panel
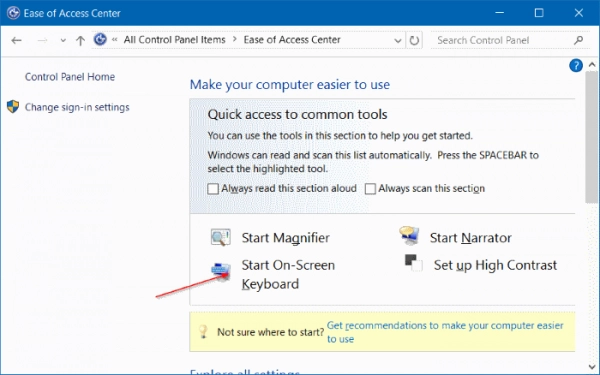
Step 1: Open Control Panel by right-clicking the Start button, then select Control Panel.
Step 2: In the Control Panel window, find and click select Ease of Access.
Step 3: Click select Ease of Access Center.
Step 4: Finally click select Start On-Screen Keyboard to open the virtual keyboard.
8. Activate the virtual keyboard every time Windows starts
From the Ease of Access Centre, click Use the computer without a mouse or keyboard, in Explore all settings.
In Type using a pointing device, select the option Use On-Screen Keyboard, then click OK.
Open the virtual Touch keyboard on Windows 10
Besides the traditional virtual keyboard available on all Windows, Windows 10 also integrates a virtual Touch keyboard for touch screens. To open this keyboard right-click on the taskbar > select Show touch keyboard button > a keyboard icon will appear next to the speaker icon. This keyboard integrates stickers. The special thing about this keyboard is when you need to use it you click on the icon, when not using it you just move the mouse away, type from the real keyboard, the touch keyboard will hide.
If used on a touch device or using a phone, remote control Windows 10 touch screen you can go to Settings > Device > Typing > turn on the option Show the touch keyboard not in tablet mode and there's no keyboard attached then every time you point the mouse at a text input area the keyboard will automatically appear.
Configure the virtual keyboard
When the keyboard is displayed on the screen, you can adjust it to suit your needs by clicking on the Options key on the virtual keyboard, at the bottom right corner. Here you have several ways to use the virtual keyboard:
- Use the Scanning Speed slider to select the scanning speed.
- Use click sound - Use this option if you want to hear a sound when pressing a key.
- Show keys to make it easier to move around the screen - Use this option if you want the keys to light up when you enter.
- Turn on numeric keypad - Use this option to expand the OSK and display the numeric keypad.
- Click on keys or press Alt + C to access the keyboard with a mouse or another pointing device by clicking on the desired key.
- Hover over keys or press Alt + H to access the keyboard with a mouse or another pointing device, by moving over the key to select. You can choose the hover duration using the Hover duration slider.
- Scan through keys or press Alt + S to access the keyboard using access devices like the spacebar, switch, or gamepad. Use this mode if you want the OSK to continuously scan the keyboard. Scan mode highlights areas where you can enter keyboard characters by pressing shortcuts, using input devices, or using devices that simulate a mouse click.
- Use Text Prediction or press Alt + T: Use this option if you want the OSK to suggest words for you, to speed up typing and check spelling.
- You can also select to add spaces for all selected words by clicking to select or pressing Alt + W.
How to pin the virtual keyboard in Windows 10
1. Open the Start menu by clicking on the Windows button at the bottom left of the screen.
2. Select Settings.
3. Click on Ease of Access in Windows Settings.
4. Select Keyboard under the Interaction title.
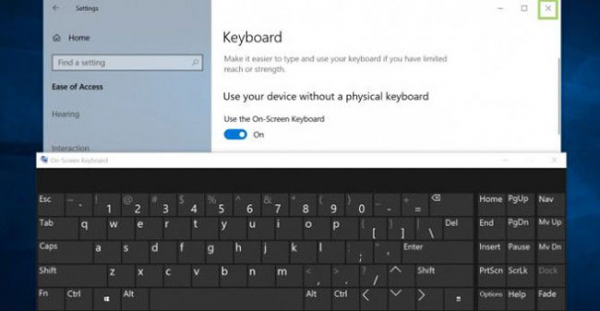
5. Turn the On button on in the Use the On-Screen Keyboard option.
6. Click X to close the Keyboard dialog box. The virtual keyboard will remain in its place.
 is a useful tool in Windows 10, helping you input data when the physical keyboard is damaged or experiencing issues.)