
Fixing the error of can't reach the DHCP server
DHCP (Dynamic Host Configuration Protocol) plays an important role in automatically distributing IP addresses and network settings to devices on a network. However, sometimes you may encounter the error "Unable to Contact Your DHCP Server" on Windows 10, resulting in loss of internet or network access.
This article will provide you with a detailed guide on how to effectively fix the "Unable to Contact Your DHCP Server" error on Windows 10.
Register DNS
Sometimes, manually initiating a dynamic DNS registration and IP address assignment can fix the error. You can do this by registering your DNS through Command Prompt.
Step 1: Type cmd in the Windows search bar, select Run as administrator on the right to open CMD with admin rights.

Step 2: Enter the following command and press Enter
ipconfig /registerdns
Step 3: Restart your computer and check if the error is resolved. If not, try other fixes.
Restart the DHCP Server
The error can occur if the DHCP service has stopped or the system cannot connect to the service. To resolve this, restart the DHCP client service.
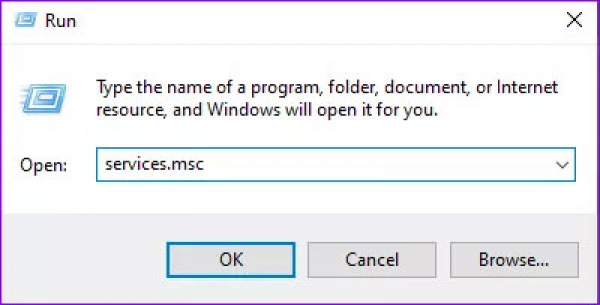
Step 1: Press Windows + R, type services.msc in the Run dialog, and press Enter.
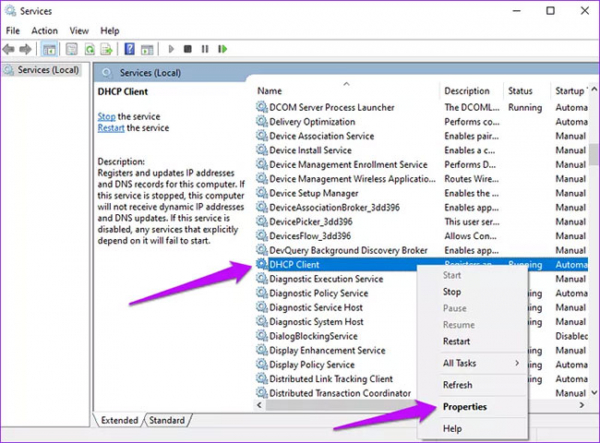
Step 2: Find the DHCP Client option, right-click it, and select Properties.
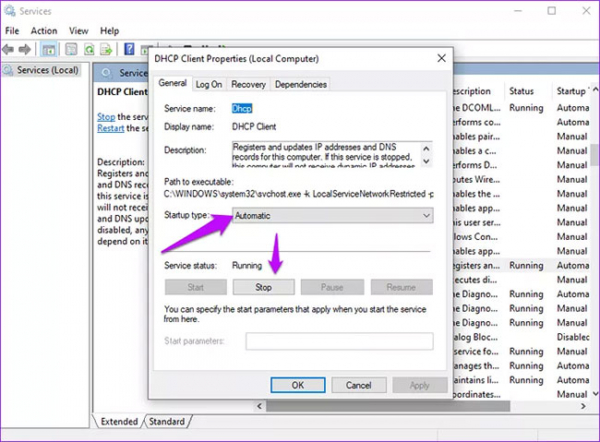
Step 3: Change Service status to Stop.
Step 4: Set Startup type to Automatic.
Step 5: Click Start, select OK, then click Apply to update the changes.
Reset TCP/IP
Resetting Winsock and the IP stack is another feasible solution to fix the error. To reset TCP/IP, follow these steps:
Step 1: Type cmd in the Windows search bar and select Run as administrator.
Step 2: Enter the following commands one by one, pressing Enter after each:
netsh winsock reset
netsh int ip reset
ipconfig /release
ipconfig /renew
ipconfig /flushdns
Step 3: Restart your computer and check if the error is eliminated.
Update and Reinstall Network Drivers
Outdated and old drivers are a common cause of DHCP server connection errors. Updating the system will install newer versions that support the current network protocols. Reinstalling network drivers helps find the appropriate drivers for the device.
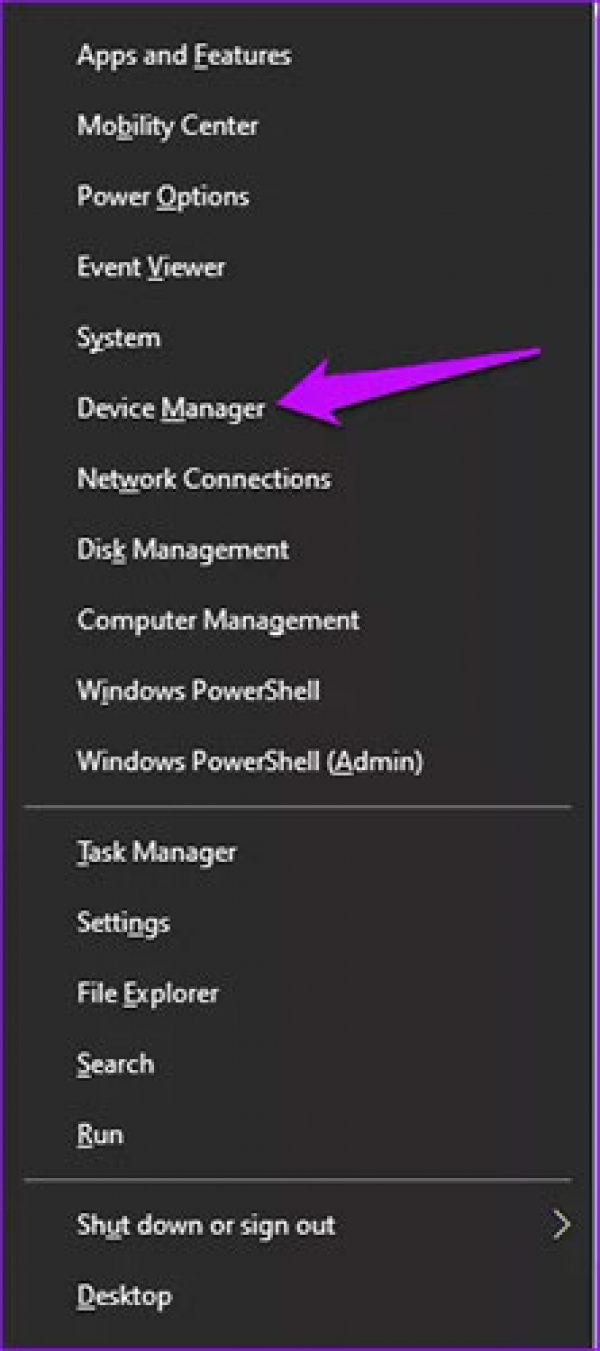
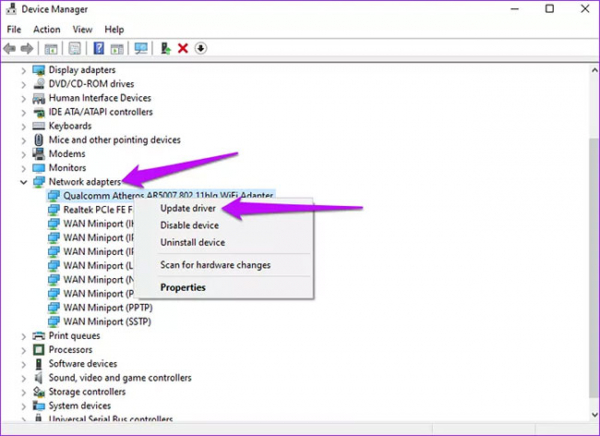
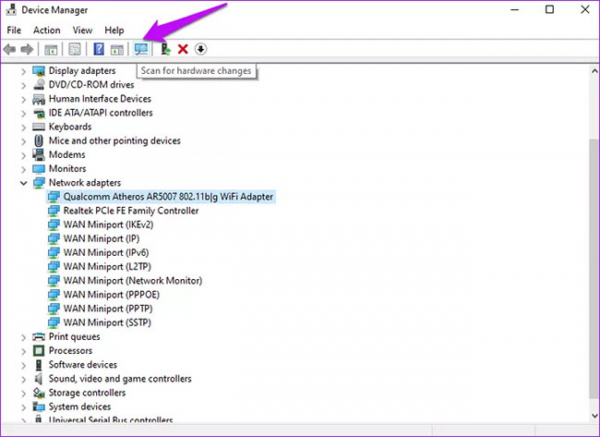
Step 1: Right-click the Windows Start button and select Device Manager.
Step 2: Locate Network adapters and expand the list. Select the problematic network adapter and click Update driver.
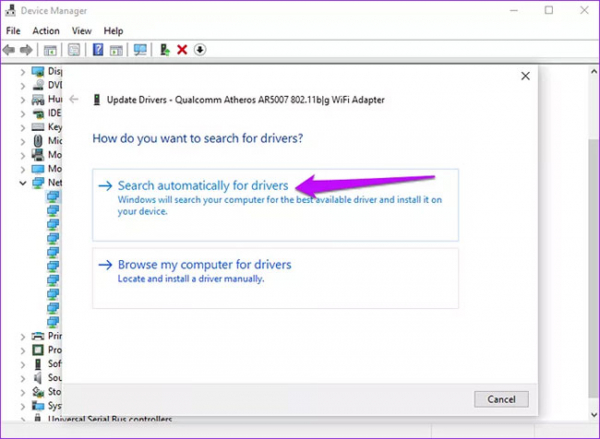
Step 3: Click Search automatically for updated driver software. Once the process is complete, restart your PC.
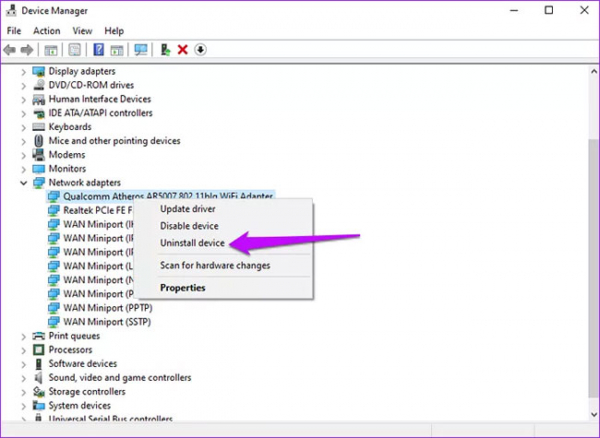
Alternatively, uninstall and then reinstall the problematic driver:
Step 1: In Network adapters, select Uninstall device.
Step 2: Confirm the process by clicking Uninstall.
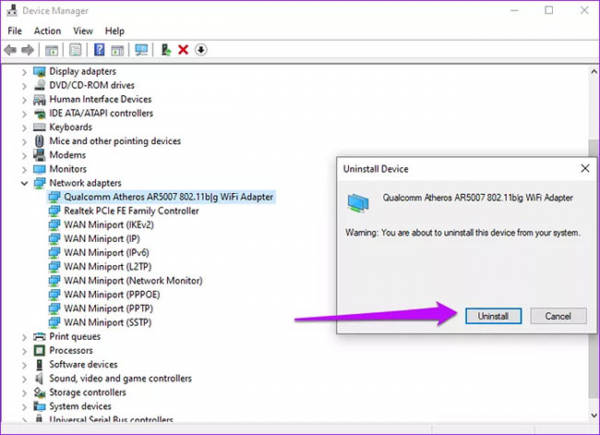
Step 3: At the top of the screen, click Scan for hardware changes.
Wait for Windows to complete the process, then restart the device.
Additionally, consider rolling back to a previous version that worked well with your computer:
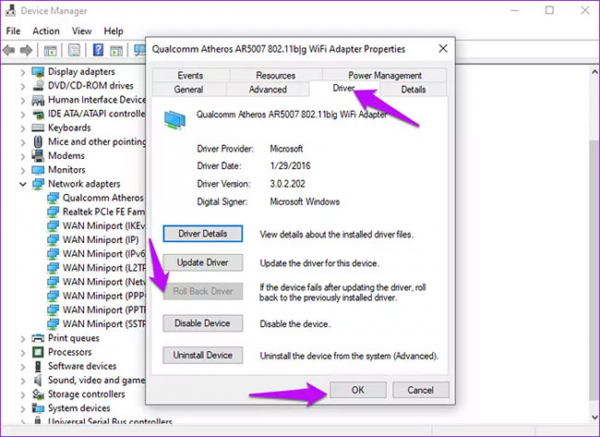
Step 1: Navigate to the problematic network adapter, right-click it, and select Properties.
Step 2: Choose the Driver tab and find the Roll Back Driver option, then select it and click OK.
Note: If the option is grayed out, it means there is no backup file because the driver has not been updated recently.
Disable IPv6
IPv6 is the latest protocol address that will replace IPv4. Since Windows Vista, IPv6 is enabled by default, but many devices and network systems do not support IPv6. If you are experiencing network connection issues, you might want to disable IPv6 to fix the error.
1. Disable IPv6 on a Network Adapter in Network Adapter Properties
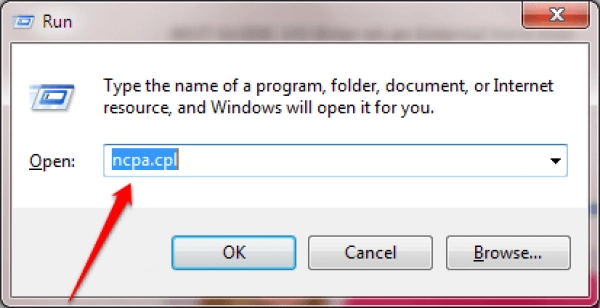
Step 1: Press Windows + R to open the Run dialog, type ncpa.cpl, and press Enter.
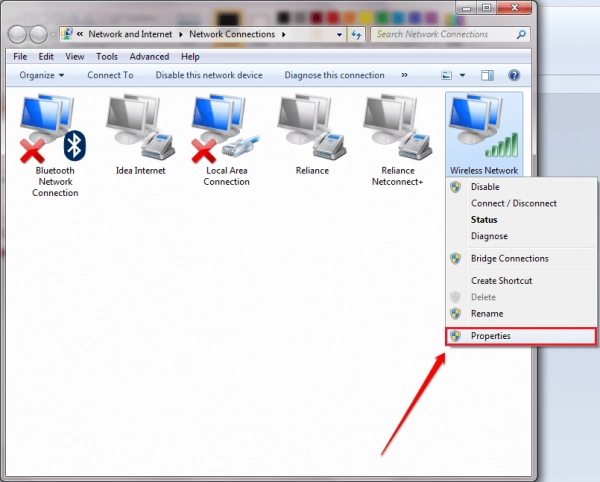
Step 2: Right-click the network adapter you are using and select Properties.
Step 3: In the Networking tab, uncheck Internet Protocol Version 6 (TCP/IPv6).
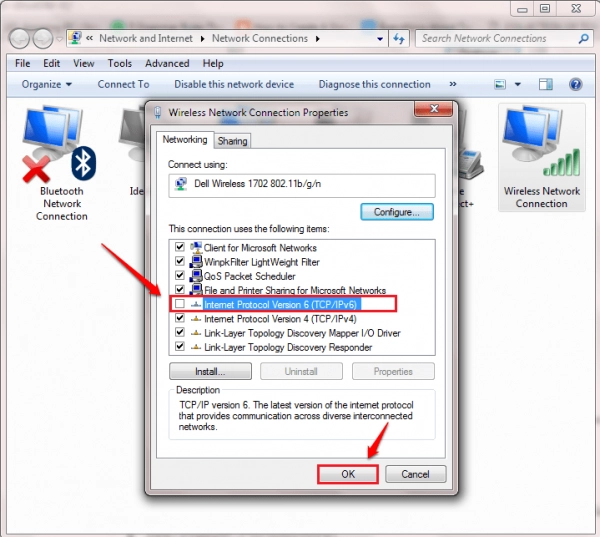
Click OK to complete.
2. Disable IPv6 on All Network Adapters via Registry Editor
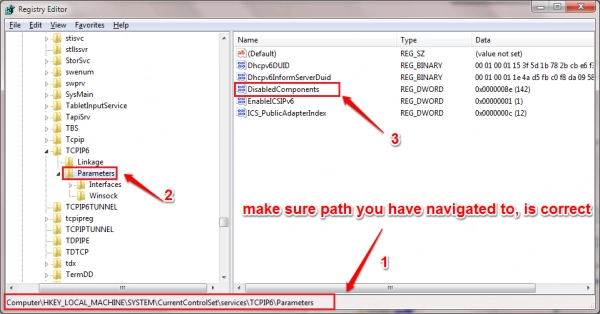
Step 1: Press Windows + R to open the Run dialog, type regedit, and press Enter to open the Registry Editor.
Step 2: On the Registry Editor window, navigate by key:
HKEY_LOCAL_MACHINE\SYSTEM\CurrentControlSet\Services\Tcpip6\Parameters
Highlight Parameters to see the items in the right pane. There, find the key named DisabledComponents.
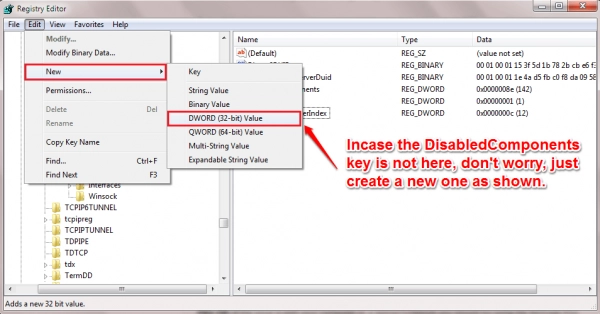
Step 3: If you do not see DisabledComponents on the right, create a new key by clicking Parameters, then Edit at the top, select New, and DWORD (32-bit) Value.
Step 4: Double-click DisabledComponents. To disable IPv6 for all network adapters, set the value data to 0xffffffff.
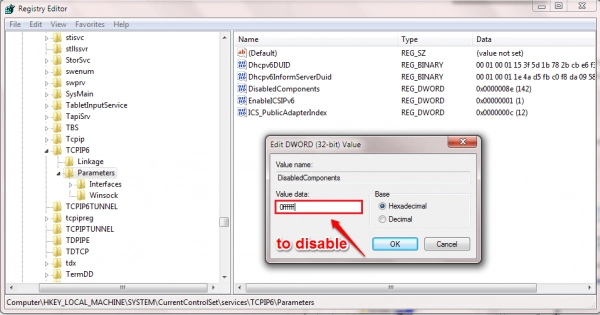
To re-enable IPv6, follow the same steps and set the value data to 0, then click OK.
3. Disable IPv6 for a Network Adapter in PowerShell
Note: This option can be used in Windows 8.1 and Windows 10.
Step 1: Open PowerShell with admin rights.
Step 2: Copy and paste the following command into PowerShell and press Enter to view the current status of IPv6 for all network adapters. Note the name of the network adapter (e.g., "Wi-Fi") you want to disable IPv6 for:
Get-NetAdapterBinding -ComponentID ms_tcpip6
Step 3: Enter the following command in PowerShell and press Enter:
Disable-NetAdapterBinding -Name "Adapter Name" -ComponentID ms_tcpip6
Replace Adapter Name with the actual name (e.g., "Wi-Fi") from step 2.
Step 4: Once complete, you can close PowerShell if desired.
4. Disable IPv6 for All Network Adapters in PowerShell
Note: This option can be used in Windows 8.1 and Windows 10.
Step 1: Open PowerShell with admin rights.
Step 2: Copy and paste the following command into PowerShell and press Enter:
Disable-NetAdapterBinding -Name "*" -ComponentID ms_tcpip6
Step 3: Once complete, you can close PowerShell if desired.
To re-enable IPv6 for (all) network adapters in PowerShell
Step 1: Open PowerShell with admin rights.
Step 2: Copy and paste the following command into PowerShell and press Enter to view the current status of IPv6 for all network adapters:
Get-NetAdapterBinding -ComponentID ms_tcpip6
Step 3: Enter the following command in PowerShell and press Enter:
Enable-NetAdapterBinding -Name "Adapter Name" -ComponentID ms_tcpip6
Replace Adapter Name with the actual name from step 2.
Step 4: Once complete, you can close PowerShell if desired.
To enable IPv6 for all network adapters
Step 1: Open PowerShell with admin rights.
Step 2: Copy and paste the following command into PowerShell and press Enter:
Enable-NetAdapterBinding -Name "*" -ComponentID ms_tcpip6
Step 3: Once complete, you can close PowerShell if desired.