
8 Ways to Free Up Disk Space on Your Mac
A Mac hard drive full of data can slow down your computer and affect its performance. For those using the Mac OS X operating system, freeing up hard drive space is a common issue. To save disk space on your Mac, you should empty the trash, remove unnecessary applications, delete temporary files, and remove language files. In this article, Gpwebmedia.net will introduce some of the simplest methods.
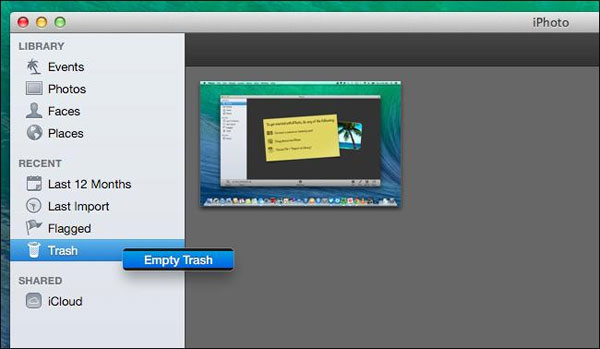
1. Empty the Trash
The Trash on a Mac is equivalent to the Recycle Bin on Windows. Instead of deleting files in Finder, files are moved to the Trash so they can be restored later if needed. To completely delete these files and free up disk space, you need to empty the Trash. In fact, a Mac can have multiple trash cans, so you need to clean all of them.
![]()
To empty the main trash can for your user account, press Ctrl and click or right-click on the Trash icon in the bottom-right corner of the screen and select "Empty Trash". This will delete all files you have sent to the trash from Finder.
Applications like iPhoto, iMovie, and Mail have their own trash cans. If you have deleted media files within these applications, you need to empty the trash for those specific apps. For example, if you use iPhoto to manage your photos and delete photos in iPhoto, you need to empty the iPhoto trash.
2. Uninstall Unused Applications
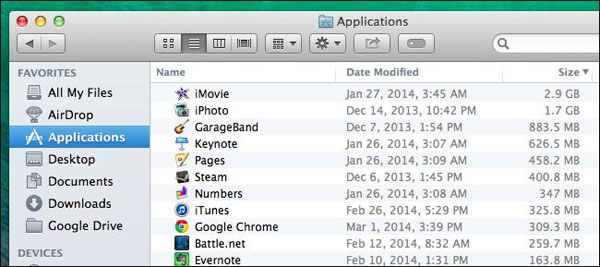
Since installed applications take up disk space, you should remove any unused applications. Open a Finder window, select "Applications" from the sidebar, and drag and drop the application's icon to the Trash.
To see which applications are taking up the most disk space, open Finder and select "Applications". Click the "Show items in a list" icon on the toolbar, then click "Size" to sort applications by size.
3. Delete Temporary Files
Temporary files can also take up disk space, so delete any unnecessary ones. Mac OS X automatically deletes temporary files, but dedicated software can find more temporary files to delete. While deleting temporary files may not necessarily speed up your Mac, it will free up valuable disk space.
There are many tools for deleting temporary files on a Mac, and CCleaner for Mac is one of the most popular. Similar to its PC version, this software helps clean up your Mac.
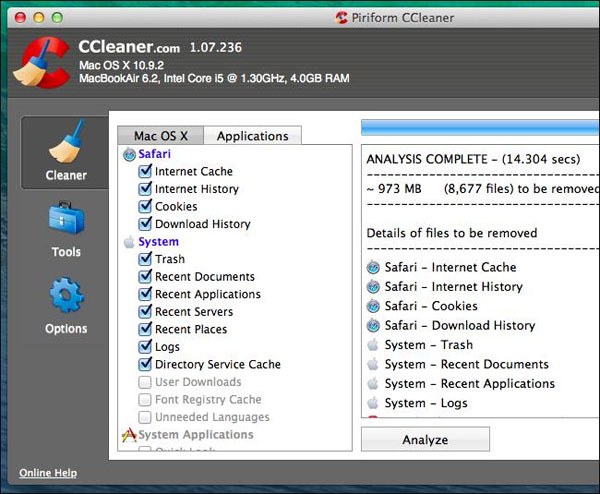
Keep in mind that deleting browser caches might not be the best idea. Browser caches contain files from websites that allow the browser to load pages faster on subsequent visits. The browser will automatically rebuild the cache as you browse, which might slow down website loading initially but speeds up over time. Each web browser limits the maximum cache space on disk.
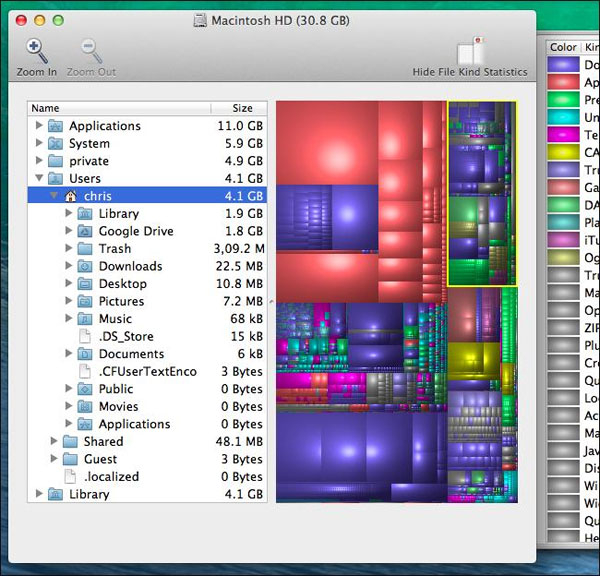
4. Analyze Disk Space
To free up disk space, you need to know exactly what is taking up space. A disk analysis tool like Disk Inventory X will scan your Mac’s hard drive and display the folders and files using the most space. You can then delete unnecessary folders and files or move some data to external drives.
5. Remove Language Files
Mac applications contain language files for each supported language. You can switch your Mac’s system language to use applications in a different language.
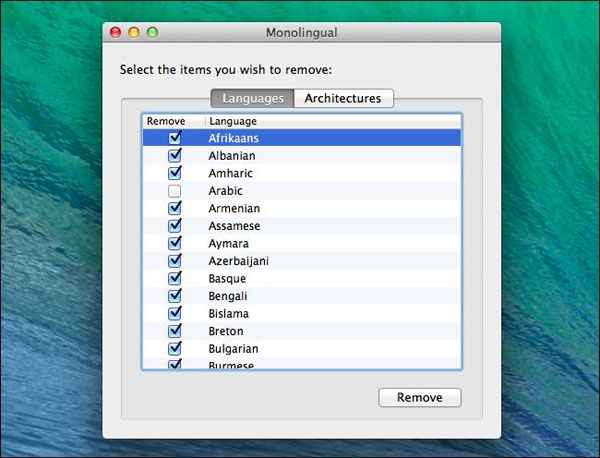
However, you might only need one language on your Mac. The unnecessary language files can take up hundreds of megabytes. To remove these unnecessary language files, you can use Monolingual. This is only useful if you need extra disk space, as these language files do not affect system performance.
6. Find Large Files
One of the quickest ways to fill up a Mac’s hard drive is by having too many large files. If this is your case, it’s time to hunt down the culprits. If you are running macOS 10.12 Sierra or later, Apple makes it easy to locate these large files.
To start, click the Apple icon in the top-left corner and select “About This Mac”.
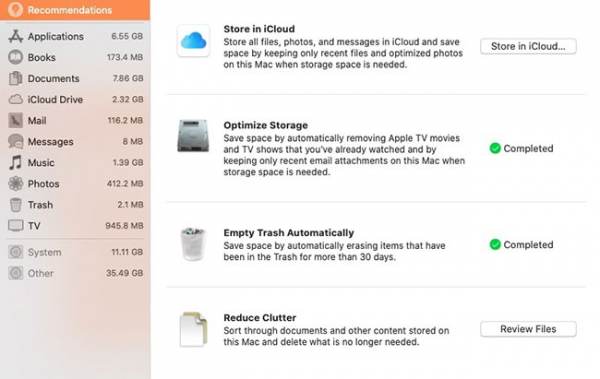
When the next screen appears, click Storage, which you will find among the five tabs near the top. The next screen provides a preview of all the file types on your system and the space they occupy. For more details, click Manage.
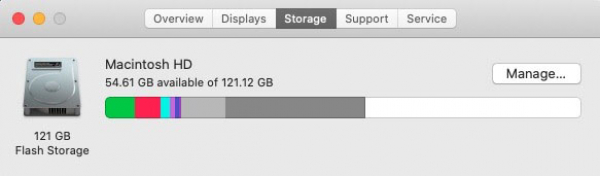
On the left, you will see the main services on your Mac and the space they are using. Start with Applications near the top and delete any unused files or applications you no longer need.
7. Say Goodbye to Duplicate Files
No matter how organized you try to be, duplicate files are unavoidable. These can be anything from photos to automatically saved versions of files or email downloads. Whatever they are, they occupy unnecessary space.
Unfortunately, Apple does not have a quick way to identify duplicate files, so you need a third-party tool called Gemini. Once you have successfully downloaded and installed this app, running it is simple.
https://macpaw.com/fr/gemini-classic
Click New Scan and choose the location on your computer you want to scan. Once these choices are made, click Scan and let Gemini work. When it has completed its evaluation, click Show Results and you can easily view the duplicate files on your computer.
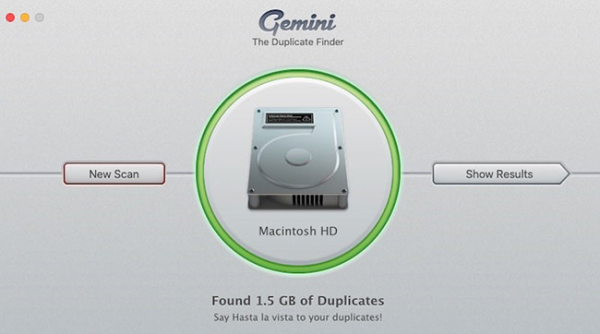
From there, you can decide what to keep and what to delete.
8. Use iCloud
iCloud has gradually become a competitor to apps like Dropbox and Google Drive. Returning to the Manage window discussed above, you will see the option to Store in iCloud. It is important to note that Apple only offers 5GB of storage by default. To truly take advantage of iCloud, you will need to pay extra, starting from around 1$/month for 50GB.
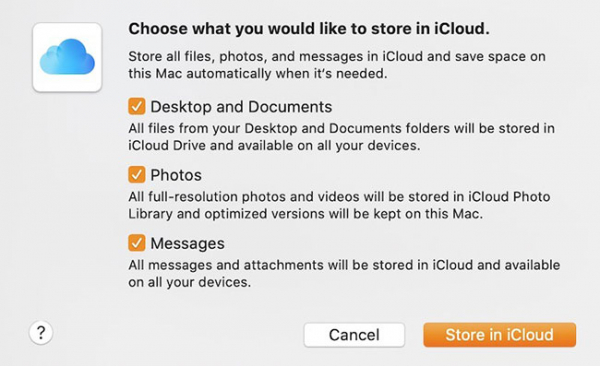
When you click the iCloud option, you will see a menu highlighting three types of files that can be moved to the cloud. With this method, the files can be viewed in the iCloud folder on your Mac but are not stored there. When you need them, they will download back to the drive for viewing.