
How to screenshot on windows keyboard shortcut?
The method of taking screenshots with Windows shortcuts is one of the topics that many users are interested in and frequently search for during their usage. If you're looking for this useful information, don't miss the following article!
To take screenshots using Windows shortcuts, you can use the following diverse key combinations:
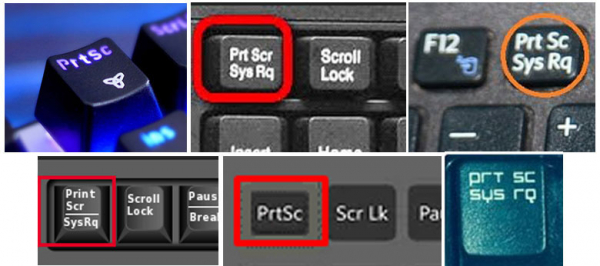
1. Using the PrtScn Key
To capture the entire screen of your Windows 10 laptop, press the “Print Screen” key (sometimes labeled “PrtScn” depending on the brand).
The screenshot will not be saved as a file, but it will be copied to the clipboard. Open an image editing tool (like Microsoft Paint), paste the screenshot into the editor, and save the file from there.
You can set the PrtScn button to open Snip & Sketch by configuring the following: Go to “Settings” > “Ease of Access” > “Keyboard” and enable the use of the “PrtScn” button to open screen snipping under “Print Screen Shortcut”.
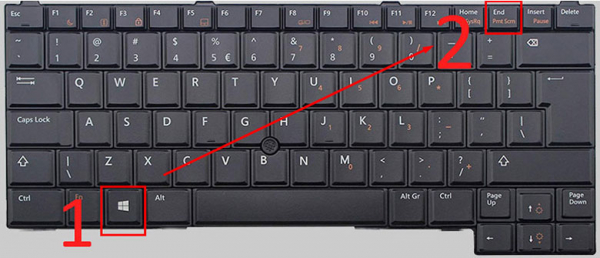
2. Using the Windows + Print Screen Key Combination
To capture the entire screen of your Windows 10 laptop and automatically save the screenshot, do the following:
- Press the “Windows + Print Screen” keys.
- Your laptop screen will quickly dim to indicate that you have successfully taken a screenshot.
- The screenshot will be saved in the “Pictures” > “Screenshots” folder.
3. Using the Windows + H Key Combination
If you want to share the captured screen with friends, use the Windows + H key combination. It will help you capture the entire screen while opening Windows Share so you can immediately share it with your friends via Facebook, email, Twitter, OneNote, etc.
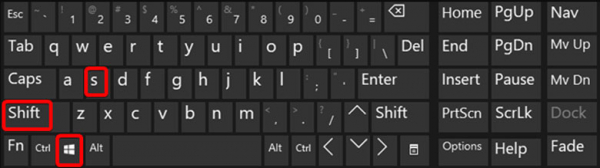
4. Using the Windows + Shift + S Key Combination
The “Windows + Shift + S” shortcut (or the new screen snip button in the “Action Center”) is also a way to take screenshots with Snip & Sketch.
Your Windows 10 laptop screen will dim, and you will see a small Snip & Sketch menu at the top of the screen, allowing you to select the type of screenshot you want.
5. Using the Windows Logo Key + Volume Down Button
If you are using a Windows Surface device, you can use the physical buttons to take a screenshot, similar to how you take a screenshot on other smartphones or tablets.
To do this, press and hold the Windows Logo touch button at the bottom of the Surface screen and then press the volume down button on the side of the tablet. The screen will dim briefly, and the screenshot will be automatically saved in the “Pictures” > “Screenshots” folder.
6. Using the Alt + Print Screen Key Combination
To quickly capture a screenshot of the active window, use the “Alt + PrtScn” shortcut.
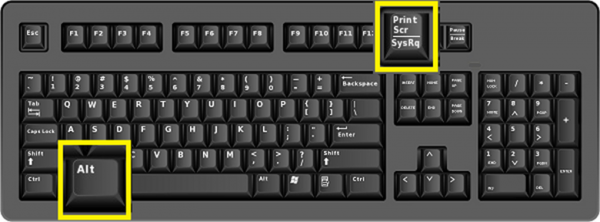
This key combination will capture the currently active window and copy the screenshot to the clipboard. You will need to open the image in an image editor to save it.