
BIOS - Basic Information for Beginners
It's likely that you seldom think about your computer's troubleshooting tools until you run into trouble. Your computer has its own troubleshooting hub, which is the BIOS (Basic Input/Output System). Without commands allowed from the BIOS, your operating system would not boot.
When you turn on your computer, the BIOS immediately becomes active. The BIOS is considered to be firmware—a type of software integrated with the hardware. An older version of BIOS is often embedded in a ROM chip and attached to the motherboard in the system. Flash BIOS is a newer type of BIOS, stored in a flash memory chip that you can erase and reprogram.
You can understand the BIOS as a pre-operating system program that enables a computer to do anything it needs without accessing software from a drive. The code written in this firmware is responsible for controlling things such as drives; recognizing the presence of main system components (such as the processor and memory capacity); communicating with the monitor, keyboard, mouse, and other peripherals, etc... It boots up the system, checks all essential configurations so that the system can launch the operating system. Once the operating system is running, its role sees the BIOS as verifying and controlling the peripherals.
Are all BIOS the same?
No, that's incorrect. There are several companies that manufacture BIOS, so different versions have different codes. Leading BIOS manufacturers include AMI (http://www.ami.com), Phoenix Technologies (http://www.phoenix.com), IBM (http://www.ibm.com), and Intel (http://www.intel.com). Some BIOS manufacturers also produce the entire system, while others focus on components, such as processors and motherboards.
How can you determine which BIOS version you have?
For Windows 10, Windows 8, Windows 7, Windows Vista, and Windows XP:
The version number of the BIOS is not something you need to be constantly updated on. The main reason you would want to check your BIOS version is to know whether there is a new update available.
Like most things in the technology world, motherboard software (BIOS) is occasionally updated, sometimes to fix bugs and sometimes to add new features.
As a part of the troubleshooting process for hardware, especially processes related to new RAM or CPUs not working correctly, upgrading your BIOS to the latest version is a worthwhile option to try.
Here are 5 different methods to check which BIOS version is installed on your motherboard:
- Methods 1 and 2 are the best solutions if your computer is not functioning properly. They do not depend on the operating system.
- Methods 3, 4, and 5 are more convenient ways to check your BIOS version, requiring your computer to be operational and only applicable in Windows 10, Windows 8, Windows 7, Windows Vista, and Windows XP.
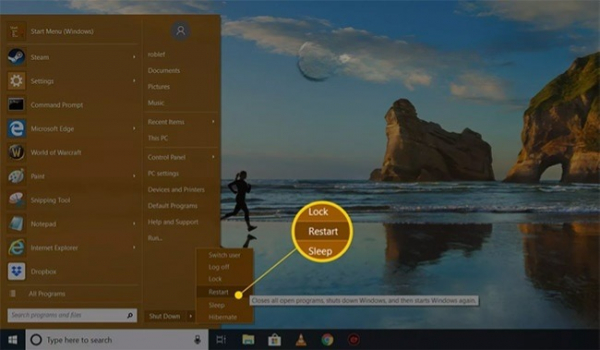
Method 1: Reboot your computer and pay attention
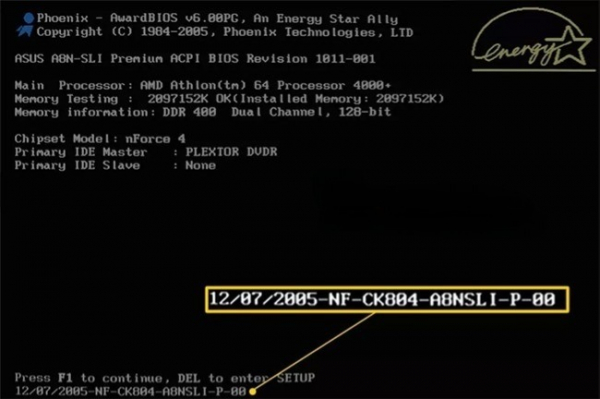
The "traditional" way to check the BIOS version on your computer is to watch the version note that appears on the screen during POST when your computer starts to boot.
Step 1. Reboot your computer normally (assuming it’s still in good working order to do so). If not, manually turn off the power and then restart the computer.
Step 2. If your computer shuts off immediately, turning it back on will also work normally.
Tip:
- Pay careful attention as the computer boots and note the BIOS version displayed on the screen.
- Some computers, especially those manufactured by major manufacturers, display the computer’s logo screen instead of the POST results. This is where the BIOS version number is contained. Pressing the Esc or Tab key often clears the logo screen and displays the POST information behind it.
- If the POST results screen disappears too quickly, try pressing the Pause key on your keyboard. Most motherboards will pause the boot process, giving the user more time to read the BIOS version number.
- If pausing doesn’t work, lift your smartphone to the computer screen and record a video of the POST results appearing on the screen. Most cameras record at 60 fps or higher, helping you capture the computer’s BIOS version.
Step 3. Write down the BIOS version number as displayed on the screen. The BIOS version number isn’t always easy to see, so write down any information possible.
Tip:
- Take a picture! If you can pause the boot process at the POST results screen, take a photo with your phone. This will store specific information for future reference.
Step 4. Now you have your BIOS version number.
Rebooting is a great method when your computer is not functioning and you can’t apply any of the more convenient methods below.
However, rebooting your computer can be frustrating, especially if you miss the BIOS version notice. The POST results screen usually flashes quickly, especially when the computer boots fast and reduces boot time.
Method 2: Let the BIOS update tool inform you
Updating the BIOS is not something you do manually. In most cases, you will use a special BIOS update tool provided by the computer or motherboard manufacturer to do this job.
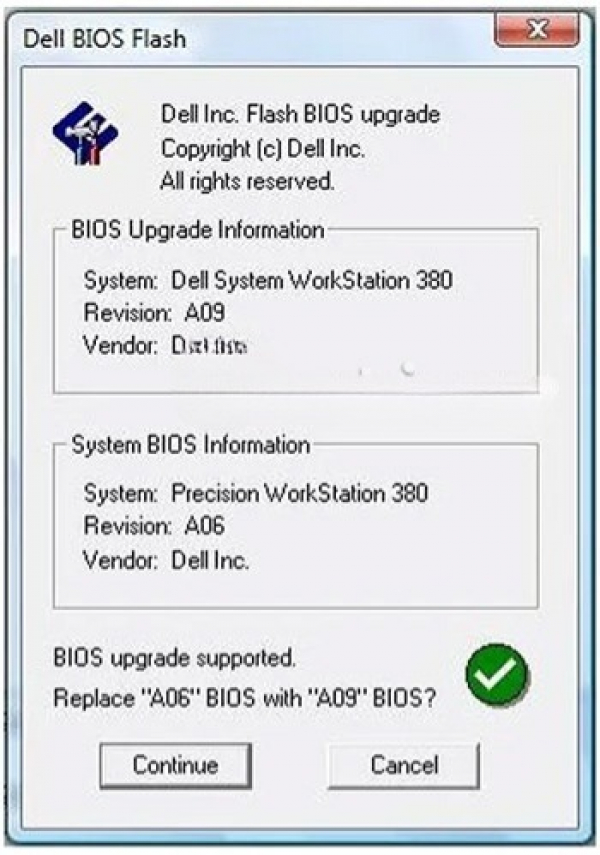
Usually, this tool will clearly display the current BIOS version installed, so even if you're not ready to update your BIOS or unsure if you need to, the BIOS update tool can be used to check the current version.
First, you will need to identify online support from your computer or motherboard manufacturer, then download and run the tool. You don't need to update anything, so skip the following steps in any instructions provided.
Note: This method works when your computer doesn't boot up properly while the BIOS update tool for the motherboard can boot. In other words, if the BIOS update program only works in Windows, you will be forced to use method 1.
Method 3: Use Microsoft System Information (MSINFO32)
An easier way to check the BIOS version running on your computer's motherboard is through a program called Microsoft System Information.
This method does not require rebooting your computer. It is already included in Windows (meaning you don't need to download and install anything).
Here is how to check the BIOS version with Microsoft System Information:
Step 1. In Windows 10 and Windows 8.1, right-click or press and hold the Start button and select Run.
In Windows 8.0, access Run from the Apps screen. In Windows 7 and earlier versions of Windows, click Start and then select Run.
Step 2. In the Run window or search box, type exactly the following: msinfo32
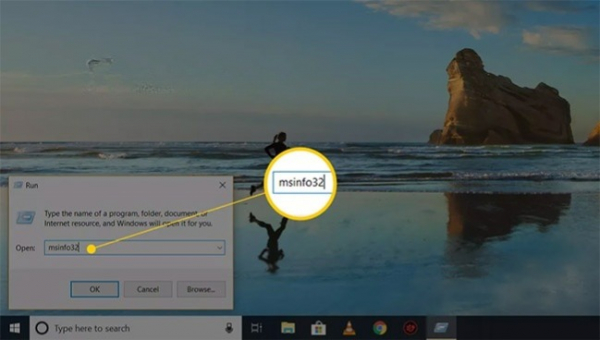
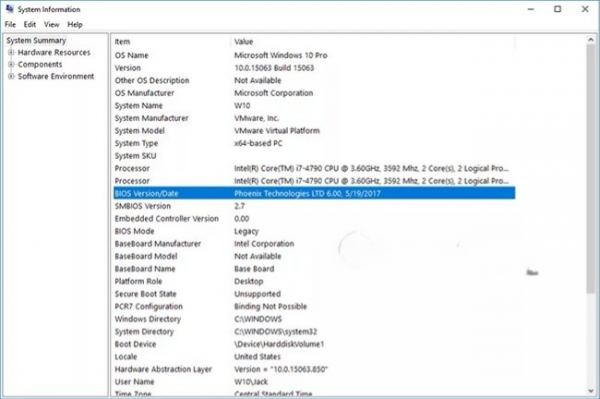
A window titled System Information will appear on the screen.
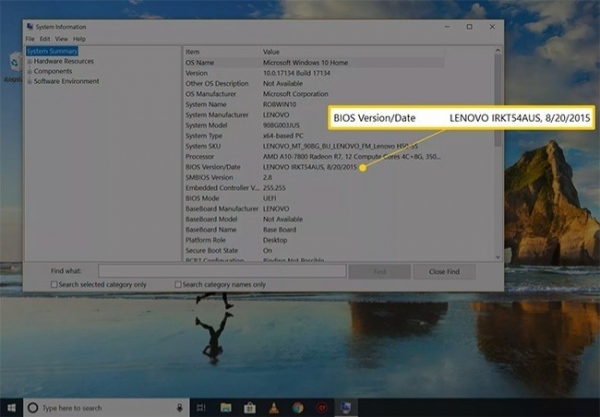
Step 3. Click on System Summary if it's not already highlighted.
Step 4. On the right, under the Item column, find the entry named BIOS Version/Date.
Note:
- In some cases, you may also need to know the manufacturer and model of the motherboard. If that information is reported to Windows, you'll find those values in the BaseBoard Manufacturer, BaseBoard Model, and BaseBoard Name entries.
- Write down the BIOS version as reported here. You can also export the results of this report to a TXT file via File > Export... in the System Information menu.
- Microsoft System Information is a great tool but it doesn't always report the BIOS version. If your computer falls into this situation, a similar third-party program is the next thing you should try.
Method 4: Use a third-party system information tool
If Microsoft System Information doesn't contain the BIOS version data you need, there are several alternative system information tools on the internet you can try. Many tools provide more detailed information than MSINFO32.
Here’s how to do it:
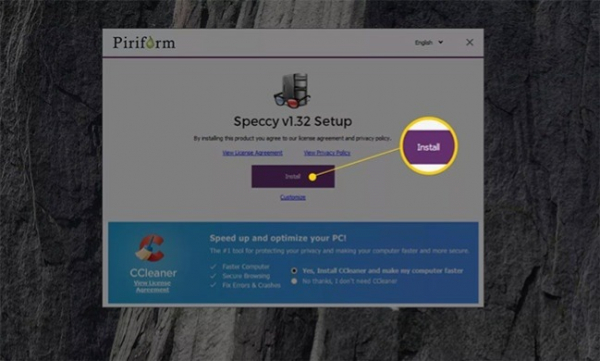
Step 1. Download Speccy, a completely free system information tool for Windows.
Note: There are many good system information tools, but Speccy is a favorite among many users. It's completely free, has a portable version, and tends to display more information about your computer compared to similar tools.
Step 2. Install and run Speccy if you chose the installable version or unzip and then run Speccy.exe or Speccy64.exe if you chose the portable version.
Step 3. Wait for Speccy to scan your computer. This process usually takes a few seconds to a few minutes, depending on your computer's speed.
Step 4. Select Motherboard from the left menu.
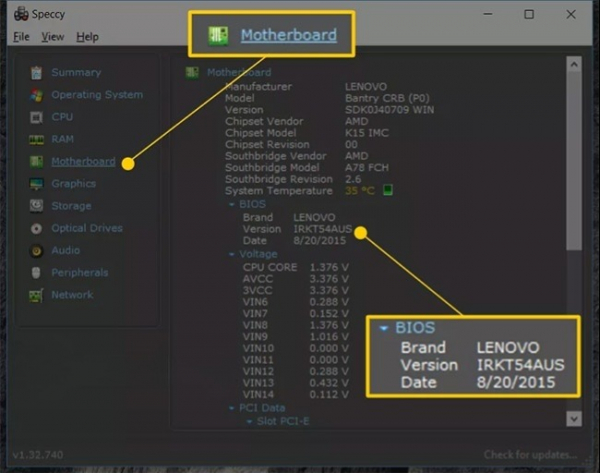
Step 5. Note the version listed under the BIOS sub-category on the right. This is the BIOS version you are using.
Tip:
- The brand listed under BIOS is often not critical information. The BIOS update tool and the data file you need will come from your computer or motherboard manufacturer, listed as Manufacturer and will be specific to your motherboard model, listed under the Manufacturer section.
- If Speccy or another "sysinfo" tool doesn't work in your case, or you don't want to download and install any software, you still have one last method to check your computer's BIOS version.
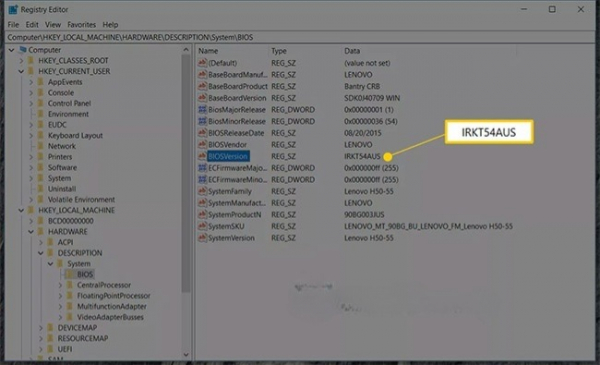
Method 5: Dig into the Windows Registry
Last but not least, and probably not surprising to those who are familiar, a lot of information about the BIOS can be found in the Windows Registry.
Not only is the BIOS version often clearly listed in the registry, but also information about the manufacturer and model of your motherboard.
Here's where to find it:
Note: No changes are made to registry keys in the steps below, but if you're apprehensive you might accidentally alter this important part of Windows, you can always back up the registry at any time.
Step 1. Open Registry Editor.

Step 2. From the list of registry hives on the left, expand HKEY_LOCAL_MACHINE.
Step 3. Continue delving into HKEY_LOCAL_MACHINE, first with HARDWARE, then DESCRIPTION, and finally System.
Step 4. With the System section expanded, press or click on BIOS.
Step 5. On the right, in the list of registry values, locate a value named BIOSVersion. The value to the right is the BIOS version installed you need.
Note: The BIOS version may be listed as SystemBiosVersion in some older versions of Windows.
Step 6. Write down the BIOS version, as well as the BaseBoardManufacturer and BaseBoardProduct values somewhere, if you need them.
The Windows Registry might seem intimidating, but as long as you don't change anything, it's entirely harmless when needing to extract information from it.
For Windows 98 or older versions
If you have an older computer, such as one running Windows 98 or an earlier version, you might see your BIOS identifier—a long string of numbers and letters—on the boot screen when you start the system. However, in more recent systems, your BIOS might be set to execute a quieter boot process, meaning you won't see the results of the POST (Power-On Self Test) that the BIOS performs when your system is turned on. Thus, you'll need to find your BIOS version elsewhere.
Try finding your BIOS version in the System Information utility, part of Windows located in the Start menu. In Windows XP, click Start, All Programs, Accessories, System Tools, and System Information. The information you need is listed under System Summary.
Open the System Information tool from the Start menu to find your BIOS version and manufacturer. In the right pane, next to the BIOS Version/Date, you'll see the BIOS manufacturer's name, version, and the date it was created. Of course, this information doesn't help you access the BIOS, but it's information you should know. In fact, you should write this data down on a piece of paper and keep it in a safe place, especially if you plan to modify your current BIOS or upgrade to a newer version.
Another option is to consult the computer's user manual. It may provide information about both the BIOS version and how to access it.
Finally, you can visit your computer manufacturer's website. There, you'll be able to find out not only about the type of BIOS you have but also how to upgrade that version. You just need to perform a simple search with keywords like “BIOS versions” or “accessing the BIOS” to get to where you need on the website. You can also narrow down the search results by adding your PC's brand to the search conditions.
For instance, IBM ThinkPad computer users can visit a page on IBM's website specifically for them at http://www.pc.ibm.com/us/thinkpad/community.html. The How To Access The BIOS page is for ThinkPad users running at least Win98 SE. Click the Detect Bios Version button to scan through your system and your BIOS version will be displayed in a pop-up window. You can also check a chart on this page for specific instructions on how to access the BIOS on your system.
How to access the BIOS?
This is not a uniform, standard process. Accessing the BIOS often varies for each computer manufacturer, if not for each system model. Since tweaking the BIOS is generally not a necessary task and often more harmful than beneficial if you don't know what you're doing, some computer manufacturers usually hide them. As with the Windows Registry, you shouldn't dig into the BIOS unless you're sure you know what you're doing and it's absolutely necessary.
You might be lucky to have a system that reveals to you the key combination to open the BIOS when you start up the computer. For instance, on a Gateway PC running WinXP, upon power-up, the first screen we see has a message that we can access our BIOS settings by pressing the F2 key.
If the boot screen doesn't provide any information, follow the method we mentioned above to discover your BIOS identifier. Your manufacturer or system handbook will be able to tell you how to access the BIOS.
When you delve into the BIOS, you might see the abbreviation CMOS (Complementary Metal-Oxide Semiconductor), especially if you have an older system. This is a type of RAM chip on your system board and is a very important place to store all your system configurations. However, the BIOS will check these configuration details every time you boot your computer and, when necessary, update the settings on the CMOS chip. Because the BIOS and CMOS are closely related, your BIOS interface might be labeled as the CMOS Setup Utility or something similar, but technically, they are not the same.
What settings can you change in the BIOS?
Your BIOS may be organized differently than ours, though probably just in how sections are labeled. Nonetheless, below are the highlights in the contents of a typical modern BIOS. We chose to describe features grouped together on multiple screens within our BIOS (manufactured by Intel).
1. Main
On this introductory screen, you'll have a snapshot of your system components: BIOS version, processor type and speed, memory speed and system bus, RAM cache, and total memory. Clearly, you cannot change these numbers unless you're swapping out the entire PC.
The only settings you can change on the main screen are language, date, and time. You use the up and down arrow keys on your keyboard to move to the relevant field, and if you're entering new data, press Enter. Though you can change the system date and time in the BIOS, you can also easily modify these parameters through the Windows interface.
2. Advanced
Now we're getting to the heart of the BIOS settings. The values entered here, if correct, will keep your system running smoothly. If not, they could cause system malfunctions, so be careful when navigating here. A very good practice is to carefully inspect this section of the BIOS whenever you upgrade your system with new hardware, be it internal components or peripherals, to see if the settings below are compatible with your new components.
a. Peripheral Configuration
Use this screen to enable or disable parallel and serial ports, plus change several other specific settings. In DOS systems, 4 serial communication ports are supported: COM1, COM2, COM3, and COM4. Only two interrupt requests, IRQ3 and IRQ4, are available for these 4 ports to allow communication between devices and the processor. When adding a new peripheral device, you will have to specify which IRQ it can use. Plug-and-Play technology usually automates these settings, but if a problem arises, now you know where in the BIOS to address it.
b. Drive Configuration
If you plan to install a new hard drive, you'll want to check this section to ensure the new settings are recorded. For example, in our BIOS, we have several setup options for ATA/IDE configurations (Advanced Technology Attachment/Integrated Drive Electronics). ATA is a hard drive specification wherein the data controller—a chip used for communication with peripherals—is located on the drive. ATA is based on IDE technology.
Also on this screen is a list of detected and undetected IDE devices. As the BIOS works, it searches for the presence of installed or attached IDE devices. If a device is detected, you might fine-tune one or two settings, but modifying these settings won't affect your IDE drives' execution; This execution is controlled by the IDE drivers and your operating system.
c. Floppy Configuration
If you're installing a new floppy drive, you might need to modify certain settings here. You'll be able to choose the capacity of the newly installed drive, for instance, a 3.5-inch, 2.88MB drive. You can also enable or disable a write-protect feature for this drive.
d. Event Log Configuration
Your system may contain a DMI (Desktop Management Interface) event log. A DMI log tracks changes made to a system, such as software installation. This screen offers you options to enable and disable the log and then view the log's contents, clear it, and mark it as read.
e. USB Configuration
USB (Universal Serial Bus) ports provide swift connections to peripherals such as mice. The USB standard is available in two versions: USB 1.1 (12Mbit/s) and USB 2.0 (also known as Hi-Speed USB; 480Mbit/s). Consider this BIOS setup section to ensure the appropriate USB version is in effect based on your installed drivers. If your BIOS does not support USB, you will need to update it before upgrading to a USB peripheral.
f. Power
These are power management settings based on ACPI (Advanced Configuration and Power Interface) specifications. ACPI settings let you know how much system power is allocated to each peripheral device. If in idle mode, a computer might turn off a device to conserve system resources. You can also enable and disable a “after power failure” setting, which determines how your system reacts in the event of a power loss.
With some other BIOS settings, these power management settings are often handled smoothly by your operating system.
3. Boot
Your choices here include a mix of settings related to booting. For starters, you can define the order in which your system boots its drives and removable devices. You can also enable or disable the silent boot feature. Additionally, you can enable and disable detection warnings for system components, such as drives, keyboards, and mice. If these warnings are turned on, your computer will alert you with a loud beep if it cannot detect a device.Exit the BIOS safely
Your BIOS may contain an Exit screen that allows you to exit this firmware safely. You can save the changes you've made in CMOS and exit the BIOS, or exit without saving anything.
Your BIOS might also have another built-in safety feature. If you choose to exit the BIOS by pressing the Esc key, you will be asked whether you want to save the changes before exiting. This safety feature will prevent you from keeping a change you've accidentally made.
Don't think such errors won't happen. Because navigating in the BIOS requires key-pressing instead of the familiar mouse-clicking, you're very liable to accidentally change a setting.
And as we've warned, even one incorrect setting in BIOS can change your reality from "entire system operating normally" to "system broken."
How to upgrade the BIOS?
Mr.Bios (http://www.mrbios.com) is a great place to find an online BIOS upgrade, especially if you have a BIOS produced by the companies listed in this screenshot.
In general, manufacturers release updates for BIOS versions for one of two reasons: to fix a bug in the BIOS or to add support for new hardware or features. Similarly, the best reason for you to upgrade your BIOS is when you've just upgraded key hardware components, such as a processor, hard drive, or graphics card.
To find a BIOS version update for your system, first, visit your BIOS manufacturer's website. If an upgrade is on this site, it will provide step-by-step instructions on how to download and install this file. Naturally, this process will vary depending on the website. Some sites may require you to fill out a form or allow the site to scan your system before you can download the appropriate upgrade file. Save the file to your hard drive, unzip it, and save it to a floppy disk. Then, insert this disk into the floppy drive and let the executable file on the disk do its job.
Alternatively, some BIOS upgrade sites might choose to send you a floppy disk with the update file and installation instructions.
Another option is to visit a BIOS upgrade website, such as eSupport (http://www.esupport.com). This site offers upgrades for several leading BIOS manufacturers. It provides several methods for getting a new BIOS. You can also visit BIOS-Drivers.com (http://www.bios-drivers.com), a site providing links to nearly all current BIOS manufacturers.