
How to restore factory settings for MacBook or iMac
If you plan to sell your Apple computer or give it to a family member, you must restore your Mac to factory settings to ensure your personal data is no longer on the device. Whether you have a MacBook or a desktop Mac, this guide will show you how to do it.
Restoring Factory Settings on Modern MacBooks or Desktop Macs
If your Mac is running macOS Sonoma, Ventura, or Monterey, there is a quick way to restore factory settings. You can do this through System Settings (or System Preferences). Follow these steps for macOS Ventura or Sonoma:
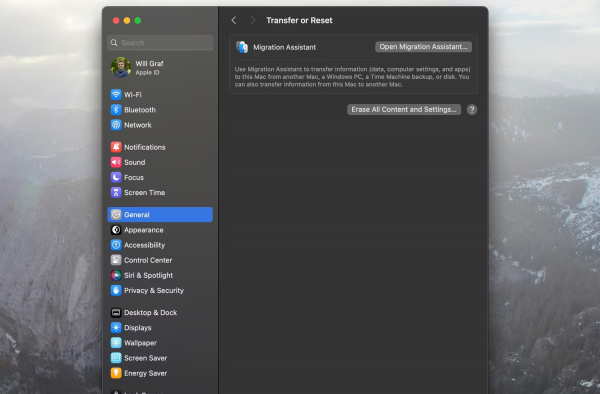
Step 1. Click the Apple icon on the menu bar and select System Settings from the drop-down list.
Step 2. Select General from the sidebar, then click Transfer or Reset on the right.
Step 3. Click Erase All Content and Settings.
If your Mac is running Monterey, here's what you need to do:
Step 1. Click the Apple icon on the menu bar and select System Preferences.
Step 2. Then, click System Preferences in the menu bar and select Erase All Content and Settings from the drop-down list.
After selecting Erase All Content and Settings, you will need to enter your Mac's administrator password. The Erase Assistant will then open and ask if you want to back up your Mac with Time Machine.
After following a few more steps, such as signing out of your Apple ID and clicking Erase All Content & Settings again, your Mac will begin the reset process.
Restoring Factory Settings on Older MacBooks and Desktop Macs Using macOS Recovery
If your Mac is running a version of macOS older than Monterey, you will need to use macOS Recovery to erase your Mac. Whether you have an Intel or Apple silicon Mac, it's easy to learn how to boot into macOS Recovery.
Note: Before entering macOS Recovery, make sure to sign out of your iCloud account.
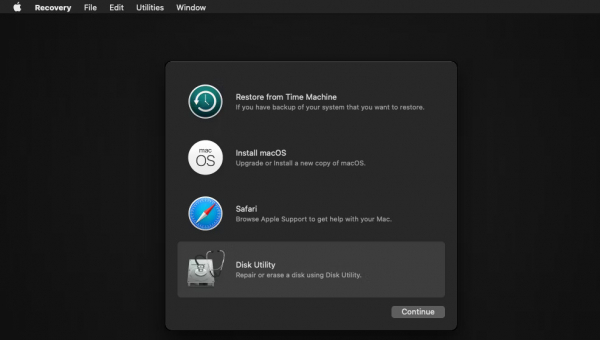
You will know you're in macOS Recovery mode because the background will be black, and no apps or files will be available.
1. Erasing Your Mac in macOS Recovery
Before proceeding with this step, ensure you have backed up all your important data. Remember, you can use Time Machine to back up your Mac easily.
When in macOS Recovery, select Disk Utility from the options on the screen and click Continue. Select the Macintosh HD drive under Internal on the left.
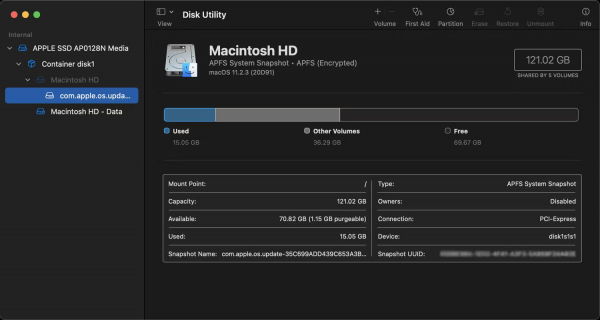
Click Erase on the toolbar at the top of the window. A dialog box will appear. Here, name the new drive Macintosh HD and set the format to APFS or Mac OS Extended. Then click Erase (sometimes, you may see Erase Volume Group instead).
Make sure to complete the same process for any other drives under Internal, but most people will not have additional drives. Any external hard drives or USB drives will appear under External, and you should not erase them but it's best to unplug them.
Exit Disk Utility to return to the macOS Recovery screen.
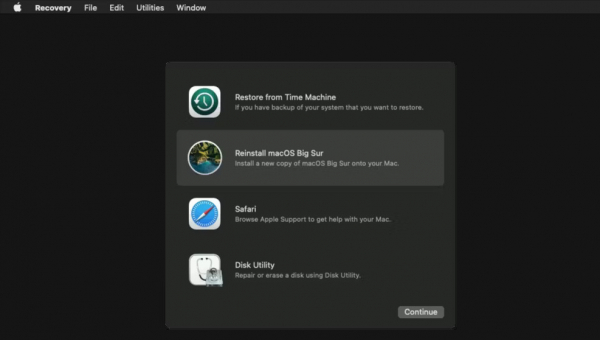
2. Reinstalling macOS Using macOS Recovery
After returning to the main macOS Recovery window, you can reinstall a fresh copy of macOS. This is necessary to use the device again, as you essentially erased the operating system when you erased the drive in Disk Utility.
Before proceeding, plug in your Mac to charge and connect it to a WiFi network. Then, select Reinstall macOS and click Continue in macOS Recovery.
Your Mac will guide you through a set of on-screen instructions to complete the reinstallation process. Each instruction is straightforward, and you won't need to do much. Essentially, your Mac will download and install the latest version of macOS from the web.
This process may take a few minutes, so be patient. Once completed, you can leave your Mac as is if you're selling it, or boot it up and use the Setup Assistant to perform the initial macOS setup as if it were a new device.

The Setup Assistant will prompt you to select your country and region, then you will need to sign in with your Apple ID. You will also need to choose some basic settings for your Mac and connect it to a WiFi network. Your Mac will be ready to use after completing these few steps. And since you erased all data, your Mac will perform faster.